

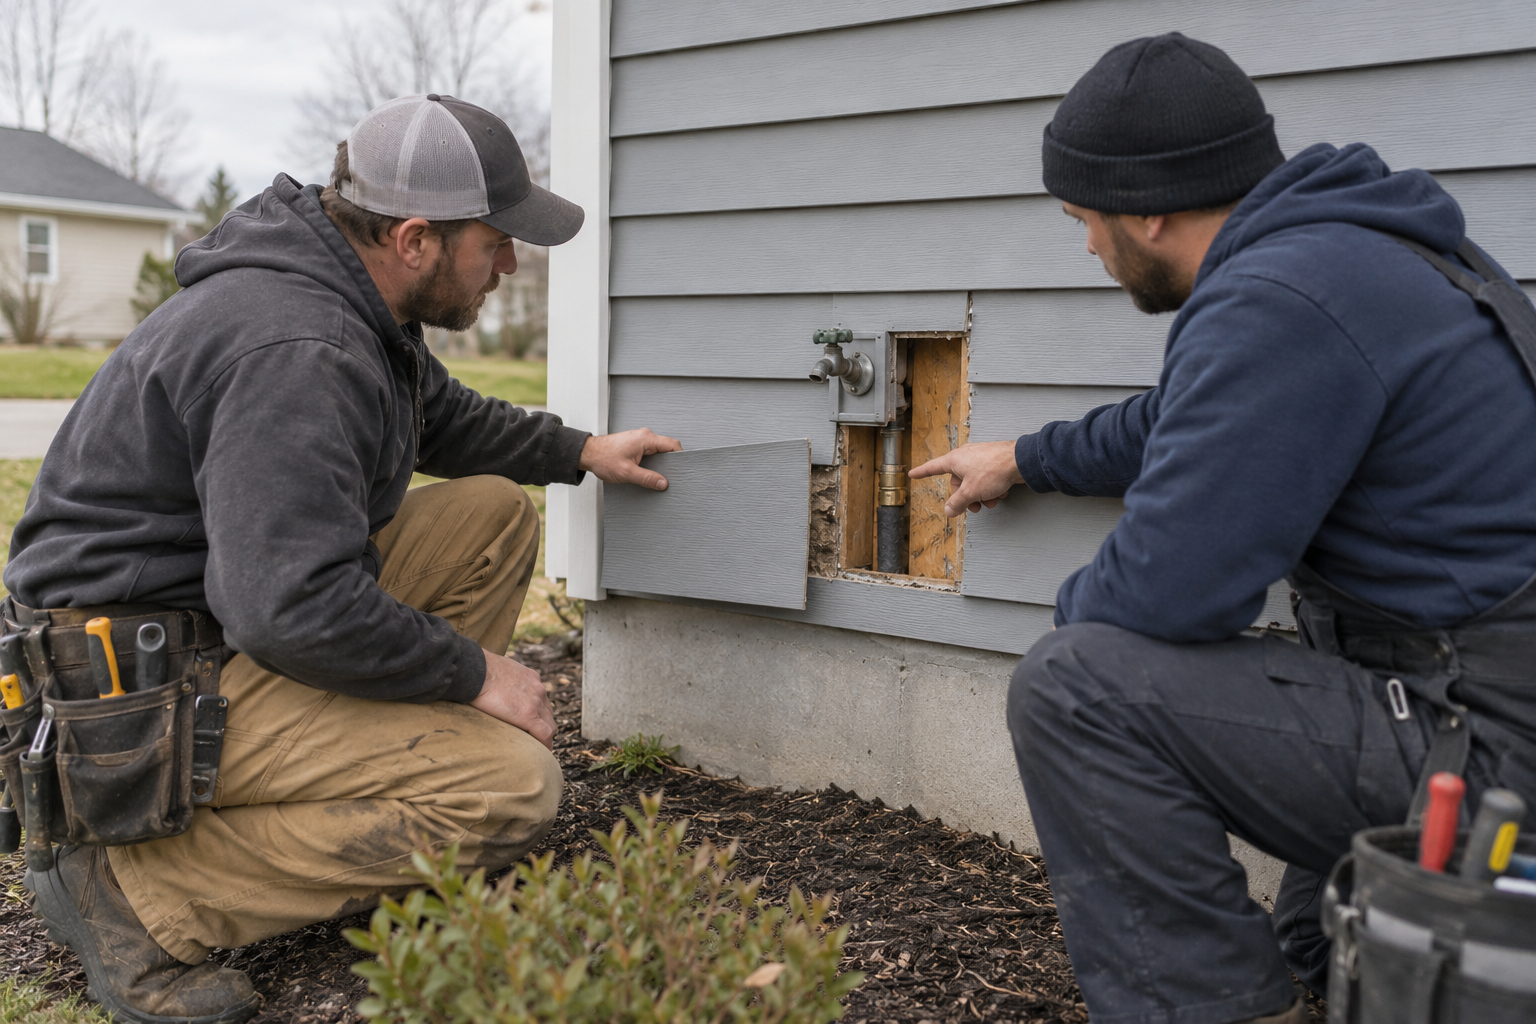
A wet patch near an exterior faucet, staining inside a perimeter wall, or damaged siding around a service penetration can raise two different concerns. Water may be entering from outdoors, or a plumbing leak may be wetting the wall from within. Sometimes both conditions contribute. Replacing a siding panel without establishing the source can leave the actual problem concealed behind an improved exterior.
Siding is the visible part of a larger wall assembly. Plumbing passes through or near that assembly at outdoor taps, utility connections, bathrooms, kitchens, and other locations. A sound repair needs to address the source of the water and the interrupted wall details. This guide explains how homeowners can coordinate plumbing and siding work so diagnosis, access, drying, and reconstruction happen in a useful order.
Begin with observations rather than a guessed cause
Note where the first symptom appeared and when it changes. A damp interior wall after fixture use may point the investigation in one direction; a mark that changes after wind-driven rain may point in another. Neither pattern is conclusive on its own. Water can travel through concealed spaces before it becomes visible, and more than one issue can affect the same area.
Photograph the overall wall and the affected detail from safe ground. Include the nearby faucet, window, utility entry, or other feature that helps explain the location. Inside, photograph the room and the visible mark without removing finishes. Keep a short timeline of rain, water use, appliance operation, and observations. These details help the trades plan a focused inspection.
Do not deliberately spray the wall, repeatedly operate a leaking faucet, or pry off siding to prove a theory. Unplanned tests can introduce more water or disturb details that would have helped the investigation. Describe what happened under ordinary use and allow the relevant professional to decide how to test the suspected source.
Control an active plumbing leak before planning exterior finishes
If water is continuing to escape from a pipe, faucet, or concealed plumbing connection, source control comes first. A 24/7 emergency plumber may be appropriate when the leak cannot wait for a routine appointment. Confirm that the provider serves your address and describe any affected interior wall, exterior cladding, or electrical equipment when arranging attendance.
Only operate a known accessible water shutoff when it is safe to do so. Do not enter standing water, touch wet electrical components, or force an unfamiliar valve. A leak near electrical service equipment or a visibly unstable area requires appropriate professional assistance. Keep children, pets, and other occupants away from the affected zone until the situation is assessed.
In a rental or shared building, notify the responsible manager promptly. The shutoff may serve multiple occupants, and authorization may be needed to open an exterior wall. Establish who can arrange plumbing attendance and who can approve siding work. The immediate response and the later reconstruction can have different decision-makers, so record that division clearly.
Understand the layers behind the siding
The exterior finish is only one part of the wall's water-management strategy. Depending on the construction, there may be sheathing, weather-resistive layers, insulation, drainage space, flashing, and interior finishes behind it. The exact arrangement varies. A visible panel repair is not necessarily a complete wall repair if water has reached those concealed components.
An opening around a plumbing penetration deserves particular attention because the pipe and the exterior details must work together. The plumber addresses the plumbing connection. The siding contractor addresses the relevant cladding and wall details within the agreed scope. A durable handoff identifies what each trade removes, replaces, and leaves ready for the other.
Provide available drawings or records of previous siding work when possible. Explain whether the wall was recently reclad or repaired and whether the affected area sits near a window, deck, or other junction. The contractor should evaluate the actual assembly rather than assume that all siding materials and all service penetrations can be repaired in the same way.
Plan access from the side that makes sense for the repair
A plumbing connection in an exterior wall might be reached from indoors, outdoors, or through an existing service access. The choice affects the siding, interior finishes, weather exposure, and working space. Ask the plumber what access is required, then involve the siding contractor if exterior layers need to be removed or reconstructed.
Discuss the planned opening before non-emergency removal begins. Establish how siding panels will be handled, what surrounding trim might need to come off, and how the wall will be protected while it is open. If the plumbing repair and exterior reconstruction happen on different days, temporary protection needs a named owner rather than a general assumption that someone will cover the hole.
Where safe access requires working at height, let qualified contractors arrange it. Homeowners should not climb a ladder or lean from a window to inspect an exterior leak. Ground-level photographs and an explanation of access constraints are enough for the initial discussion. Equipment, site conditions, and weather belong in the professional work plan.
Use the opening to establish the real extent of damage
Once relevant finishes are opened, the trades can assess conditions that were not visible beforehand. The wet area may extend beyond the first stain, or the surrounding materials may be in better condition than expected. Ask for photographs and an explanation of any finding that changes the scope. The repair boundaries should follow observed conditions and the assembly requirements.
A plumbing repair alone does not decide whether sheathing, insulation, or interior finishes can remain. Likewise, a siding contractor should not be expected to diagnose every plumbing component. If substantial concealed moisture, suspected mold, or uncertainty about damaged materials is present, an experienced restoration professional may need to assess the area before reconstruction.
If damage raises concern about framing or structural support, obtain the appropriate building assessment. This is especially important when deterioration or movement is discovered around an opening. The goal is not to enlarge every repair, but to resolve material questions before they are hidden again. A documented decision is more useful than either blanket replacement or automatic reuse.
Keep drying and cleanup separate from recladding
An exterior surface may dry quickly while materials deeper in the wall remain affected. Do not use the appearance of the siding as evidence that the entire cavity is ready to close. Ask who will assess moisture, what conditions must be met, and who will authorize the reconstruction stage. Record that decision alongside the plumber's repair information.
The EPA's moisture guidance emphasizes resolving the water problem and drying affected materials. For a wall repair, that supports a clear sequence: repair the source, address damaged materials, then restore the assembly. A coating or new panel should not be used to cover an unresolved moisture issue.
Weather also influences the work plan. The contractor should explain how the opening will be protected and what conditions allow the materials and details to be installed as intended. Avoid treating temporary weather protection as the permanent finished repair. A homeowner should know which stage the wall has reached and what work remains.
Restore the penetration and surrounding wall details together
After the plumbing work is tested and the wall is ready, the reconstruction should address the complete agreed detail around the penetration. Ask how the pipe entry relates to the surrounding water-management layers and cladding. A bead of sealant on the outside is not a universal answer to every concealed wall problem.
The appropriate methods depend on the siding system, the existing construction, the penetration, and product requirements. Request a description of the proposed repair rather than choosing materials based only on colour or convenience. If the original wall detail is unclear, resolve it with the responsible contractor or building professional before reinstatement.
Plan for future plumbing service where appropriate. If a component requires accessible maintenance, discuss how that need will be accommodated without compromising the wall. The access arrangement should be part of the design and scope, not an improvised opening left behind after the repair. Photograph the completed concealed details before the exterior finish covers them.
Discuss matching, availability, and visible repair boundaries
A replacement panel may not look identical to siding that has been exposed to weather for years. Product availability, colour changes, texture, and the configuration of adjoining pieces can all affect the repair's appearance. Ask what can reasonably be matched and whether the quoted scope includes only the immediate damage or a broader section needed for a consistent result.
Some materials can be removed and reinstated more readily than others, and the contractor may need to evaluate whether existing pieces can be reused. Do not assume that a small plumbing opening means only one panel will be affected. The access and fastening arrangements can influence how much surrounding work is necessary.
Review the proposed finish with the contractor before approving the reconstruction. Separate functional requirements from appearance choices so neither is overlooked. A repair should restore the intended wall performance while setting realistic expectations for colour and texture. Clear photographs and a marked scope help both parties understand the agreed boundaries.
Coordinate the estimate and final inspection
Ask the estimate to identify removal, protection, assessment, material replacement, wall detailing, siding reinstatement, and related interior work where included. Keep the plumbing scope separate but coordinated. Establish how concealed findings will be documented and how additional work will be approved. This avoids discovering at the end that drying, trim, or painting was never assigned.
At completion, review the visible repair with the siding contractor and retain the plumber's explanation of the source and repair. Collect photographs of the open wall and reconstructed details, along with relevant invoices and product information. If fresh dampness or staining appears during ordinary use or later weather, record it and contact the responsible provider promptly.
Calgary Siding works with residential and commercial siding systems listed on its service website. Its quote request can help start a discussion about exterior reconstruction after the water source is understood. Share the plumber's findings, access needs, and photographs so the repair plan addresses the wall behind the siding as well as the finish you can see.
Easy steps to create a color palette
Lorem ipsum dolor sit amet, consectetur adipiscing elit lobortis arcu enim urna adipiscing praesent velit viverra sit semper lorem eu cursus vel hendrerit elementum morbi curabitur etiam nibh justo, lorem aliquet donec sed sit mi dignissim at ante massa mattis.
- Neque sodales ut etiam sit amet nisl purus non tellus orci ac auctor
- Adipiscing elit ut aliquam purus sit amet viverra suspendisse potent
- Mauris commodo quis imperdiet massa tincidunt nunc pulvinar
- Excepteur sint occaecat cupidatat non proident sunt in culpa qui officia
What is a color palette?
Vitae congue eu consequat ac felis placerat vestibulum lectus mauris ultrices cursus sit amet dictum sit amet justo donec enim diam porttitor lacus luctus accumsan tortor posuere praesent tristique magna sit amet purus gravida quis blandit turpis.

Don’t overspend on growth marketing without good retention rates
At risus viverra adipiscing at in tellus integer feugiat nisl pretium fusce id velit ut tortor sagittis orci a scelerisque purus semper eget at lectus urna duis convallis porta nibh venenatis cras sed felis eget neque laoreet suspendisse interdum consectetur libero id faucibus nisl donec pretium vulputate sapien nec sagittis aliquam nunc lobortis mattis aliquam faucibus purus in.
- Neque sodales ut etiam sit amet nisl purus non tellus orci ac auctor
- Adipiscing elit ut aliquam purus sit amet viverra suspendisse potenti
- Mauris commodo quis imperdiet massa tincidunt nunc pulvinar
- Adipiscing elit ut aliquam purus sit amet viverra suspendisse potenti
What’s the ideal customer retention rate?
Nisi quis eleifend quam adipiscing vitae aliquet bibendum enim facilisis gravida neque euismod in pellentesque massa placerat volutpat lacus laoreet non curabitur gravida odio aenean sed adipiscing diam donec adipiscing tristique risus amet est placerat in egestas erat.
“Lorem ipsum dolor sit amet consectetur adipiscing elit, sed do eiusmod tempor incididunt ut labore et dolore magna aliqua enim ad minim veniam.”
Next steps to increase your customer retention
Eget lorem dolor sed viverra ipsum nunc aliquet bibendum felis donec et odio pellentesque diam volutpat commodo sed egestas aliquam sem fringilla ut morbi tincidunt augue interdum velit euismod eu tincidunt tortor aliquam nulla facilisi aenean sed adipiscing diam donec adipiscing ut lectus arcu bibendum at varius vel pharetra nibh venenatis cras sed felis eget.